There are few things as awful as an epoxy floor that is peeling, chipping and looking terrible. While the fault can be attributed to the choice of Epoxy, more often then not the problem is how the floor was prepared prior to the application on the Epoxy coating. Most of the following tips apply to several different application types of floor coating like a roll coat as well as a self leveling floor. These tips also apply to several different types of coatings like epoxy, urethane etc. So here are some Epoxy garage flooring tips.
The number one thing you should take away from this brief article is to always grind your floor. There are lots of coatings that state it is not necessary. This is not true!! It does not matter if the coating is an Epoxy, Urethane, Aliphatic, MMA, etc., always grind the floor. In most cases you will not have the equipment to grind a floor and if it is something you don’t think you can do or don’t want to do, hire someone to do it or have a professional do your Epoxy flooring project. In most major cities there will be a rental place that will have the equipment necessary to grind a concrete floor. You want to go to a place that caters to contractors. You don’t need lots of equipment but you do need the Good Stuff! Here are the basics.
An upright floor grinder. A real upright, not a glorified hand grinder with a handle and wheels. It will be heavy and should come with the diamond wheel attached.
A hand grinder. These come in different sizes like a small 4″, 7″ etc. I would go with a 7 or 10 inch and you will need a diamond wheel for it.
Last, but the most important thing you will need is a vacuum setup for the grinders. These are special HEPA vacuums designed for fine concrete dust. The upright grinder and the hand held grinder will both have a shroud on them to attach the vacuum to. You can make your life a lot easier if you put a pre-separator between the vacuum and the grinders. These are simple setups that catch lots of heavy concrete dust before it can reach the vacuum. They work great!
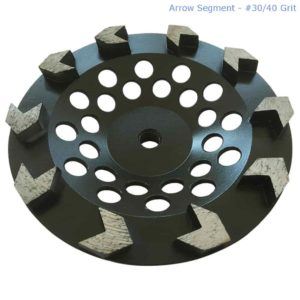
If you are renting the equipment from a professional outfit that caters to contractors, chances are they will have the diamond wheels you will need. If not, don’t scrimp on the diamond wheels. The quality of the diamonds matters a great deal. There is a huge difference between a $125.00 diamond wheel and a $25.00 one. You will go through several $25 ones on a garage floor. A quality Diamond wheel will last through the job. The Arrow diamond wheels are the style I like best.
Prior to making the commitment and grinding your floor, I suggest testing the moisture/vapor pressure of your concrete slab. We normally do a preliminary test by taping squares of foil down in several areas of the floor and waiting 24 hours for signs of moisture. The best test is a calcium chloride test. You can buy kits for about $50 online. and the results are very accurate. The instructions are easy. You are basically measuring the weight of the moisture absorbed into the calcium packet and calculating a vapor pressure. If your vapor pressure is 3lbs or more, don’t do an epoxy floor. There are coatings to get around this limit but you will need a professional for that.
Once you have assembled the big equipment, you will need safety equipment like ear protection, eye protection, a respirator and dust mask, gloves, etc.
Grinding a floor is very loud work and can get unnerving. The vibration from the grinder combined with the noise can make you freak fast.
Before you do any grinding you will want to clear the entire area and sweep the floor. Any grease or oil stains will need to be cleaned before grinding. There are lots of special cleaners for this. I use some pretty strong ones followed by Simple Green. You want to use the hand grinder to grind up to the edge of the wall and around anything you cant get the big grinder close to like posts or stairs. Then you run the big grinder over the floor. With both the big grinder and hand held grinder you want steady sweeping motion with even pressure. Don’t tilt the grinder or you will groove into the concrete and this becomes much more apparent after the coating is applied. The profile you are looking for is about 60 to 80 grit. Like the sand paper.
If you have any cracks in the concrete you can easily fit a piece of paper into, they will need to be “chased”, opened up with an edge grinder. You want to form or open the crack into a V.
Another important epoxy garage flooring tip is to vacuum the floor extremely well after grinding! use your grinder vac with an extension wand and wide floor nozzle. Go vacuum crazy.
Your choice of epoxy is critical. Go with a major paint company brand. Stay away from the box store stuff. Follow the mixing instructions. On the first coat we like to dilute the coating down a bit so it can easily absorb into the concrete. To roll a floor coating, as opposed to a self leveling floor where the coating is poured out and “raked”, you will need a good frame and a solvent resistant cover. I like a 3/8 nap. Use a pole on the frame. After the epoxy is mixed and any induction time is observed, plan your roll. Roll from corner to corner working your way out of the room. Apply uniform coverage. We normally fill cracks prior to the roll but you can let the epoxy “pool” a bit in the cracks to fill them. If the cracks are significant they will need to be filled with the appropriate product for your choice of coating before the roll.
For a roll coat, plan on three coats. Four coats if you are broadcasting decorative chips or a an anti-slip media. Wait the proper time between coats. If you are broadcasting chips or texture you can make life easier if you get some spike shoes. They fit on your shoes and allow you to walk out on a wet floor. When broadcasting chips it works better to throw the chips up in the air and letting them fall down onto the floor. Don’t throw chips at the floor. It’s a good idea to practice on some concrete to see how they fall and to get the knack of it.
After the chips are down and dry, use a broad drywall knife and lightly scrape the chips in all four directions. Then vacuum up all the loose chips. You can now seal the chips or texture with a coat or two of the appropriate clear epoxy.
After everything is good and dry you are ready to roll! Get it?


